
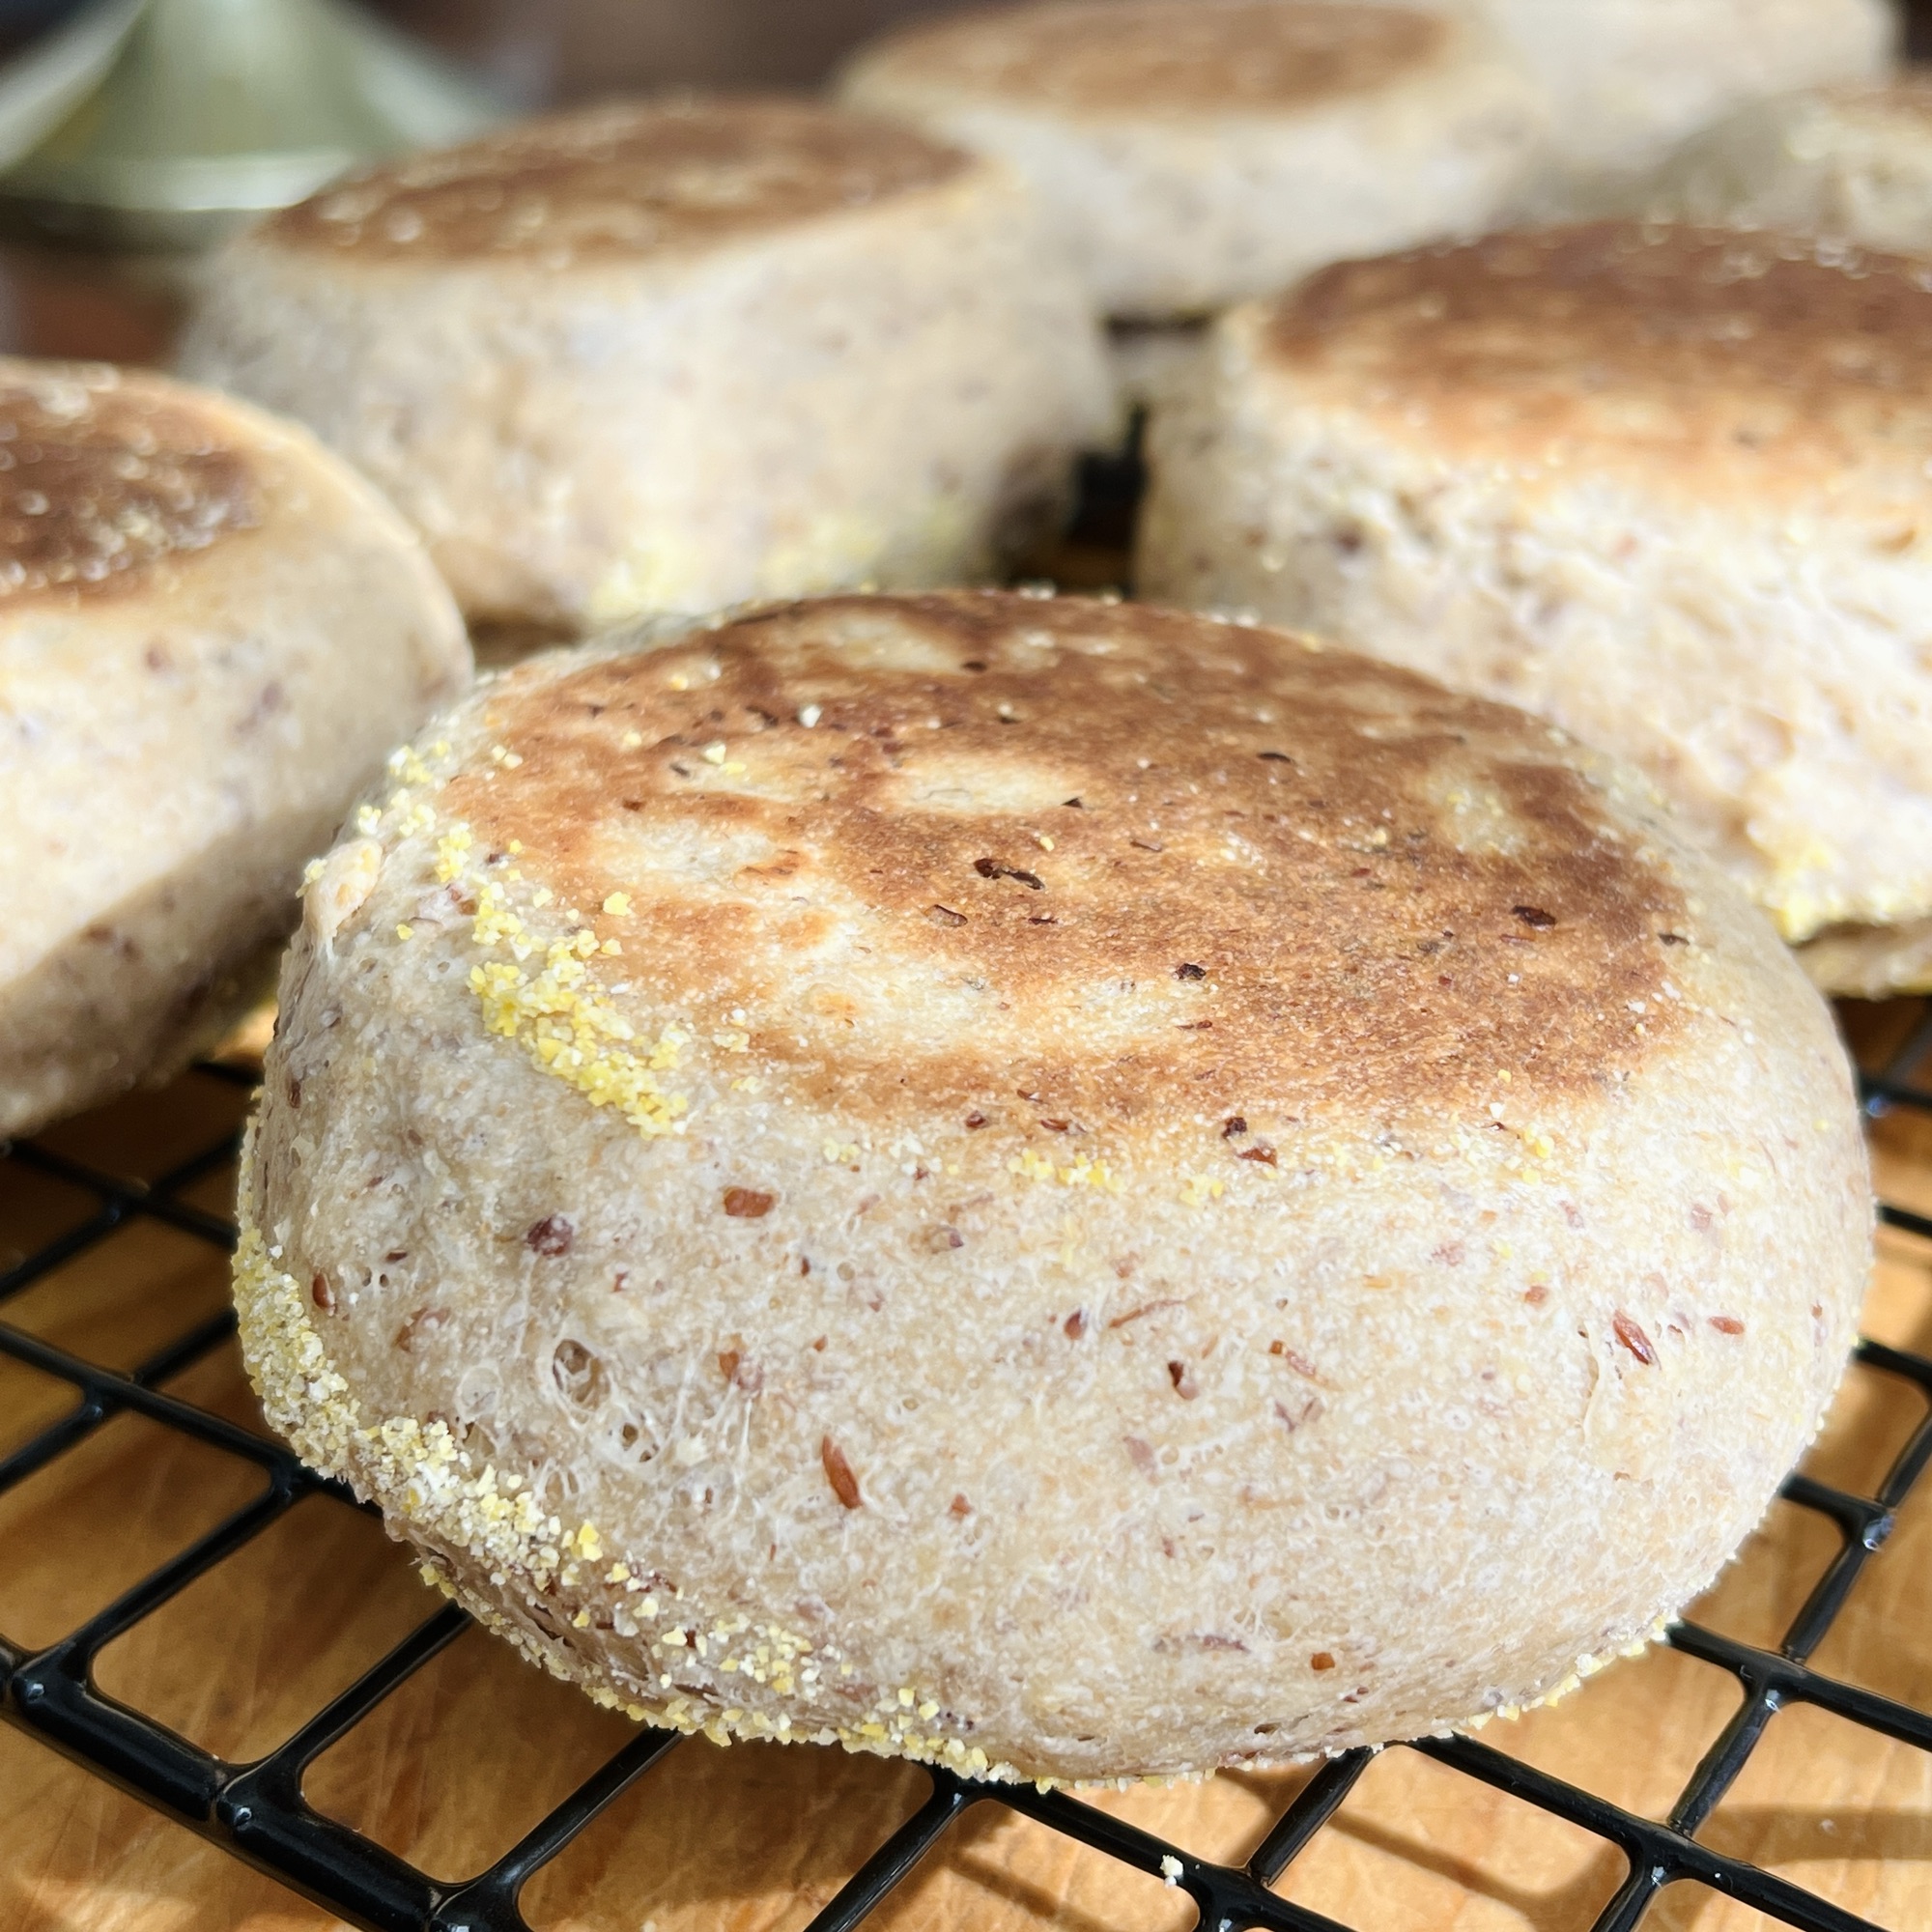
This isn’t your standard “off the shelf” English muffin. We’re talking Multigrain Bread Machine Sourdough English Muffins. A blend of all-purpose flour, spelt or wheat, oats, and ground flaxseed, sweetened with a bit of honey.
Sure, white flour English muffins are fantastic, I make them all the time! But why settle for one flavor when you can have variety? Here at my blog I like to give you options and multigrain offers a whole new flavor for your next batch of homemade muffins! Stay tuned and subscribe, I have more flavors coming soon!

What You’ll Need:
Bread Machine- Any size will work because we are not baking in it. We are only using the dough cycle so any 1, 1-1/2, or 2 pound machine will do. If you are new to a bread machine altogether, check out my Bread Machine Master Butter Dough where I give you all my best tips. If you would like another sourdough bread machine recipe, also read my article, The Ultimate Bread Machine Guide to a 100% Sourdough Sandwich Loaf.
Active Starter- I use a slightly lower hydration starter. It is generally on the thicker side, like pancake or waffle batter. Make sure it is active and bubbly before starting. I tend to feed mine the night before and use it early in the morning, roughly 6-8 hours before getting started. This will depend on your starter and environment such as temperature, humidity, etc.
Filtered Water- I don’t recommend using tap water of any kind because of the chlorine, fluoride, etc. can destroy the wild yeast. I always use a bottle of filtered water for both feeding my starter and making bread, so it’s the same here. Using it at room temperature is just fine in warmer months, but if your kitchen is particularly cold, opt for warmer water, no more than 85 – 95°F.
Butter- Salted or unsalted is fine, just no margarine please.
All-Purpose Flour- Organic unbleached flour is great for sourdough bread making because it has natural wild yeast and beneficial bacteria in it already that encourages a healthy starter and dough. Bleached flours are chemically treated to whiten and remove these vital microorganisms, and can affect the final out come of the bread. A quality Unbleached Bread Flour can also be used, it will likely give you a little bit of a better rise and structure, but I get great results with both.
NOTES: The all-purpose flour I use has a 11.5% gluten content.
Spelt or Wheat Flour
Old-Fashioned Oats
Ground Flax
Salt- No iodized, use sea salt or plain table salt.
Honey
Oil- You will need oil to grease your bowl before the cold fermentation in the fridge. Be careful not to use too much, just enough to coat the surface of the bowl and the dough, you shouldn’t see any “puddles” of oil. A little extra oil will also come in handy to rub into your hands to release the dough from the bread machine pan. That will prevent it from sticking to you. It will also be needed for cooking. I prefer Avocado or Coconut Oil.
Large Glass or Plastic Bowl- For the cold fermentation.
Medium Ground Cornmeal- This not only prevents the dough from sticking to the parchment paper, it gives them it characteristic rustic crunch.
Large Sheet Pan for Baking– I use a standard “half sheet” size.
Parchment Paper
Electric Griddle OR Large Skillet- The larger electric griddles should fit all 8 muffins at once. I prefer the electric griddle because it gives me better control of the temperature, if using a skillet on the stove adjust the temperature as needed.
Cooling Rack- optional
Digital Scale- optional. Using a scale allows me to use less dishes by carefully measuring into the bread pan that is resting on my scale. With practice, this has made things easier, faster, and less dishes! Aside from that, there are some important points to mention. Volume measurements can be affected by factors like how ingredients are packed or scooped. Weight measurements provide accuracy, allowing you to replicate your sourdough success more reliably.
NOTE: This recipe has been tested in grams, metric measurements are provided in the recipe card below.

Bread Machines & Sourdough
The best of both worlds. Both convenient and healthy. No kneading by hand or extra steps in the stand mixer, no stretches and folds. No rolling and cutting out circles or messy shaping. Hello, minimal effort!
Just toss your ingredients into your bread machine, press a button, and let the dough cycle do its thing. While your machine works its magic, you can curl up with a book, plan your day, and check some things off of your list, knowing perfect English muffins are in your future.
I even have a special tip for those highly anticipated nooks & crannies, with a trick to make meal prep a breeze. (No one likes a complicated breakfast early in the morning, or afternoon, I don’t judge)
If you are all about sourdough AND bread machines, keep reading. This recipe is as easy as it gets using the dough cycle!
Breakfast just got a serious upgrade. It’s time to bake your own fluffy, tangy sourdough English muffins with minimal effort, thanks to your handy kitchen gadget. Yes, you heard that right, another sourdough recipe using the bread machine. Minimal fuss and maximum reward.
The beauty of this method lies in its simplicity. No long, messy hand-kneading sessions, no finicky shaping and proofing. Just toss a few basic ingredients into your bread machine, press a button, and let the magic happen.
No rolling, biscuit cutters, no special techniques needed. Just let your bread machine do all the work and wake up the next day to make some fresh English muffins. It’s time to ditch the pre-packaged sourdough imposters, but keep the convenience. This is REAL sourdough, no added vinegars or flavors. If you are like me and never thought you would be making them yourself… then this recipe is for you!
A helpful piece of advice if you are new to making English Muffins. Read through all of the information before getting started. It will help you tremendously to have a good visual.
If you need more information, a sample timeline is provided below. As with any bread machine recipe I always recommend the following:
- Making sure your paddle is in place before getting started.
- Removing your bread pan before adding ingredients.
- Adding ingredients as written in the recipe card below (wet to dry) unless otherwise written in your machines instruction manual.
Want to make another version? Check out the search bar in my blog for other Sourdough English Muffin recipes.
Tips for making THE BEST English Muffins!
This dough tends to run a little on the wet side but do not fret! Whether or not you are a seasoned bread machine user or new to the game, I’ll hand out the same advice here. The first 5 minutes of mixing and kneading is the most important step in achieving a good “dough ball”.
What is different with this recipe is the addition of oats and flax. It will have a puddle under the paddle, but at about the 5 minute mark it should fully come together. The oats and the flax require the moisture and should soak it all up by then.
If after 5 minutes, it does not “soak” up enough, just add one tablespoon of flour and see how it does. Do this again ONLY if needed, but try not to add too much extra flour or your dough will be dry once the oats & flax do their thing. (Humidity and temperature does vary from kitchen to kitchen and always plays a part in the outcome of your dough.)
Use plenty of cornmeal to coat the sheet pan or parchment paper lined pan. This prevents your nice shaped muffins from sticking. When the dough is chilled it is less sticky, but as it warms up and bulk ferments, it softens. The cornmeal helps you lift the dough off the paper. You can lightly dust the tops if you want cornmeal on both sides.
Do your best to not bring all that cornmeal onto the griddle. Some will come along, you do need it, but not too much of it or it will burn.
Pre-heat your oven and your griddle skillet at the same time. These are very easy and once baking day comes the whole process goes from griddle to oven in minutes so it is best to be ready!
Have your cooling racks nearby. Same as above, this goes quickly and you’ll want these muffins cooling so you can split them open and slather them with butter. They need to hang out for a few minutes because they will be very hot coming out of the oven.
Use a fork to split open for those extra nooks and crannies! You can slice them open, but using a fork to poke around the edge and split it open is the best way in my opinion. I like to do this to all of my muffins before I store them away. Whether they go into the freezer or the fridge… it makes mornings so much easier to just pull them open, no knife needed.


TIMELINE Example:
If you don’t start your day at 7 am, no worries! Just scale this timeline to suit your day better. Write it out and stick it to your fridge. Make notes & adjustments if you need to, this is just a step-by step guide that I use to make my own English Muffins!
Before Bed: Feed your starter as you normally do, making sure you have more than 1 cup or 240 grams, you’ll need some leftover to keep it going.
NOTE: If you have another method for getting your starter active for baking, do that.
7:00 AM-(Day 1) Add the ingredients as directed in the recipe card below. Start your bread machine on the dough cycle (1 hour 30 minutes)
Bulk fermentation begins when kneading ends (1 hour 10 minutes remaining), set a timer for the remainder of the time left on the machine.
8:30 AM The bread machine finishes. Check in on the dough. It should be nice & smooth. Continue to bulk ferment in the machine as is for an additional 3-6 hours. This will depend on the temperature & environment of your kitchen and THE activity of your starter. Check in on it after about 1-2 hours & adjust the bulk fermentation time accordingly. Set a timer.
11:30 AM (up to about 2:30 PM) Grease a large glass or plastic bowl with a neutral oil. Then using oiled hands, remove the dough from the machine and place into your bowl. Lightly oil the surface of the dough. Cover with plastic wrap and refrigerate until the morning.
6:00 AM-(Day 2) Prepare your baking sheet with parchment paper and a light dusting of cornmeal.
On a silicone pastry mat or a clean countertop, divide the chilled dough into 8 pieces as shown in the photos below.
Shape (folding, smooth side up) into buns, pinching and sealing the seams closed at the bottom. Gently flatten out to a patty shape or like a hamburger bun with your fingers and place on the cornmeal/parchment prepared baking sheet.
Cover with a lightweight towel and proof in a warm location (about 75°F-24°C) for 1-2 hours. If you have a cooler kitchen, the oven with the light on is a good spot, put a note on the oven if you need a reminder not to turn it on.
7-8:00 AM Once they have increased in size & puffed up a bit. Pre-heat your oven to 350°F/180°C/Gas Mark 4 (remove the muffins if they are proving in there).
If you are using an electric griddle, pre-heat it to 300°F/150°C-325°F/165°C. If using a skillet, pre-heat to medium-low or medium.
Just before cooking, melt coconut oil or grease the griddle with a neutral oil. Carefully cook all 8 muffins for 3-4 minutes per side. The goal is lightly browned, toasted.
Reduce the heat as needed on your griddle/stove. As they are cooking, prepare the baking sheet with a fresh piece of parchment paper.
BAKING TIME: When they are done on the griddle, transfer to the plain parchment lined baking sheet and bake in the oven for about 15-20 minutes, until the internal temperature reaches 205-210°F.
FINISHING LINE: Let them cool for about 10 minutes, then split open by poking with a fork all around the edges and splitting open for the ultimate nooks & crannies experience. Toast them or serve as is. Enjoy!
The times and directions provided can be used as is, OR adapted to fit your schedule and climate of your kitchen. Take notes of any changes you may need to make and add it your this or your own timelines.
Sourdough is about practice and reading the dough. You may need to bake several batches before you have that ah ha! moment. Give yourself grace, practice makes progress. Even with a great recipe, your starter and environment is unique. Go with what works for you!

Need another TIMELINE example?
Take the dough straight to the fridge AFTER the machine is done. The average time on a bread machine dough cycle runs for 1 hour 30 minutes. As soon as your dough cycle ends, place it in a greased bowl and cover it well.
The next day (up to 24 hours) divide and shape the dough onto the parchment lined/cornmeal prepared pan. Bulk ferment in a warm place for 3-6 hours. Again, this time will vary depending on your environment, temperature, humidity, and the activity of your starter.
Follow the remaining steps as written above for cooking and baking. And there you have it, two simplified timelines to get you to some homemade English muffins.
One important note to make about this particular timeline… the surface of the dough can dry out even if it is covered by a light towel. If that happens, I spray them with water right before cooking on the griddle and I get great results.
Beyond Breakfast!
Sure, they’re perfect for slathering with butter and jam or toasted with a few slices of avocado and an egg cooked your way. But these English muffins are also versatile so let’s think outside the box. Keep it simple and create a savory breakfast sandwiches with bacon, and cheese, or craft mini pizzas for an afternoon snack. Toast them and top with roasted vegetables and hummus for a light lunch.

Save ’em for later…
Make a batch and refrigerate or freeze them for quick, homemade English muffins anytime throughout the week or beyond.
Let them cool completely. Using a cooling rack if you have one, let them rest for about an hour before storing them away in an air-tight container.
“Pre-cut” them. For those perfect nooks & crannies, I HIGHLY recommend piercing the sides of the muffins all the way around while they are still room temperature.
Store them in the fridge. Keeping them cool in the fridge helps them stay fresh longer, up to one week if they last you that long.
Freeze them. Use an air-tight container or freezer Ziploc bag to keep in the freezer for up to 3 months. Take one out at a time as needed, they are already “pre-cut” so just pull them apart and defrost to toast as normal.
Looking for more SOURDOUGH? Check these out!
Easy Bread Machine Sourdough English Muffins
Bread Machine Sourdough Liège Waffles
The Ultimate Bread Machine Guide to a 100% Sourdough Sandwich Loaf
The Easiest Sourdough Drop Biscuits
Overnight Sourdough Belgian Waffles
If you try these Multigrain Bread Machine Sourdough English Muffins or any of my other recipes. Comment & rate below.


You can also find me on Facebook & Pinterest!

Subscribe today for FREE weekly recipes sent directly to your inbox!
Be sure to check your email to confirm.

Multigrain Bread Machine Sourdough English Muffins
Equipment
- 1 1, 1.5, or 2 lb Bread Machine
- 1 Electric Griddle or Large Skillet
- 1 Large Sheet Pan I use a standard "half sheet" pan
- 1 Cooling Rack optional
- 1 digital scale, optional
Ingredients
- 3/4 cup filtered water, room temperature
- 1 cup active sourdough starter, See Notes
- 3 tablespoons honey
- 3 tablespoons butter or neutral oil, room temperature
- 1-1/4 cup all-purpose flour or bread flour, See Notes
- 1-1/4 cup spelt flour or wheat flour
- 1/4 cup old-fashioned rolled oats
- 1/4 cup ground flax
- 1-1/2 teaspoons sea salt, or table salt, no iodized
For Cooking: Do not add to the machine.
- 1/4-1/3 cup medium ground cornmeal, for preparing the baking sheet and preventing sticking.
- neutral oil, for cooking
Instructions
The Night Before:
- Feed your starter as you normally do, making sure you have more than 1 cup or 240 grams, you'll need some leftover to keep it going. NOTE: If you have another method for getting your starter active for baking, do that. (See the sample timeline in the article above).
Day 1:
- Make sure your paddle is in place before getting started. Removing the bread pan before adding ingredients.
- Add the ingredients as listed directed by your machines user manual. Start your bread machine on the dough cycle (1 hour 30 minutes)
- This dough tends to run a little on the wet side but do not fret! The first 5 minutes of mixing and kneading is the most important step in achieving a good "dough ball". The addition of oats and flax requires time for them to soak up the liquid a little bit. It will have a puddle under the paddle, but at about the 5 minute mark it should fully come together. If after 5 minutes, it does not, just add one tablespoon of flour and see how it does. Do this again ONLY if needed, but try not to add too much extra flour or your dough will be dry once the oats & flax do their thing.
- Bulk fermentation begins when kneading ends (1 hour 10 minutes remaining), set a timer for the remainder of the time left on the machine.
- When the bread machine finishes, check in on the dough. It should be nice & smooth. Continue to bulk ferment in the machine as is for an additional 3-6 hours. This will depend on the temperature & environment of your kitchen AND the activity of your starter. Set a timer… check in on it after 1-2 hours & adjust the bulk fermentation time accordingly.
- Grease a large glass or plastic bowl with a neutral oil. Then using oiled hands, remove the dough from the machine and place into your bowl. Lightly oil the surface of the dough. Cover with plastic wrap and refrigerate until the morning or up to 24 hours.

Day 2:
- Prepare your baking sheet with parchment paper and a light dusting of cornmeal about 1/4-1/3 cup.
- On a silicone pastry mat or a clean countertop, divide the chilled dough into 8 pieces as shown in the photos. Shape (folding, smooth side up) into buns, pinching and sealing the seams closed at the bottom. Gently flatten out to a patty shape or like a hamburger bun with your fingers and place on the cornmeal/parchment prepared baking sheet.Cover with a lightweight towel and proof in a warm location (about 75°F-24°C) for 1-2 hours. If you have a cooler kitchen, the oven with the light on is a good spot, put a note on the oven if you need a reminder not to turn it on.NOTE: You can lightly dust the tops if you want cornmeal on both sides.

- Once they have increased in size & puffed up a bit. Pre-heat your oven to 350°F/180°C/Gas Mark 4 (remove the muffins if they are proving in there). If you are using an electric griddle, pre-heat it to 300°F/150°C-325°F/165°C. If using a skillet, pre-heat to medium-low or medium.

- Just before cooking, melt coconut oil or grease the griddle with a neutral oil. Carefully cook all 8 muffins for 3-8 minutes per side. Reduce the heat as needed. The goal is lightly browned, toasted. As they are cooking, prepare the baking sheet with a fresh piece of parchment paper.

- BAKING TIME: When they are done on the griddle, transfer to the plain parchment lined baking sheet and bake in the oven for about 15-20 minutes, until the internal temperature reaches 205-210°F.

- Let them cool for about 10 minutes, then split open by poking with a fork all around the edges and splitting open for the ultimate nooks & crannies experience. Toast them or serve as is. Enjoy!

- Store in an air-tight container at room temperature for 3 days, refrigerate for up to one week or freeze for 3 months.
Leave a Reply